Sunday, December 8, 2013

Out Sketching at the zoo.

Soooo i finally bit the bullet and paid for an annual pass to taronga zoo, its about the best thing next to life drawing to improve ones drawing skills if you ask me - even more so if you're a creature/character designer. The fact that you're subjects are contantly moving forces you to capture the building blocks of an idea - gesture, pose, rhythm, and by the time you look up to fill in details - that freakin' Roo has changed its pose - hence you're forced to think!

The subject gives you minute to block them in, after that you're on your own (theres no chance you can just be lazy and look and copy)  - you're forced to think of form in 3d space, how the rhythms of the surface flow, how surfaces overlap, and of course you're forced to use your imagination. Sure your drawings all end up being very gestural in the end, coz sometimes you get all of about 10 seconds to capture a pose - but thats where the real important juicy bits of any design are - thats the meat of the potatoes, thats the stuff that sells and emotes, after that you can go home and detail to your hearts content.This stuff forces you to capture gesture, shape, and form under pressure and quickly - and if you've mastered that, well the detailing is just draftsmanship and many hours spent noodling if you ask me. So anyways here were a couple sheets from todays venture out, just using solid graphite 4B pencil on sketchpad, i might take my watercolors next time.


Oh and it certainly doesn't hurt to take inspiration from guys like David Colman, or Chris Ayers to give your procrastinating side a reason to work up these preliminary sketches to full illustrations...

Monday, December 2, 2013

My Observations on Linear Workflow within MAYA 2013

So for the past like year or so, ive been confused as hell over using a linear workflow within maya - mostly because of the convoluted way you have to go about it - gamma correcting stuff, playing with color profiles... list goes on. So anyway, after many attempts at it, i pretty much kept away from it, figured they'd have it all fixed up next release... (kinda worked). In the end, the benefits of working in a linear workflow finally drew me back in - mostly the amount of flexibility it offers you when you're doing levels and color adjustments in post. Its pretty much like having a RAW file as opposed to JPG for those of you who play around with digital cameras. LWF gives you alot of flexibility and as such makes it easier to get realistic renders more or less.


So anyways there is for my purposes, 2 methods of using a linear workflow, one that seems to be what everyones accepted and use - where you have to gamma correct all your swatches. And the other i came up with because i cant stand having to gamma correct swatches; on account of i use swatches more, and hence would prefer just gamma correcting my textures. So to get my head around it heres the test i did: I saved out 3 scenes, 1st scene i left alone at default and rendered in 8bit tiff without any color management. 2nd scene i used mayas proposed linear workflow and gamma corrected swatches. 3rd scne i used my own linear workflow and gamma corrected only my textures. So anyways heres the setup for the 2 methods:


METHOD 1: (Basically what it tells you to do in MAYA HELP)

1:Render Settings Color Management:
               INPUT PROFILE :SRGB
               OUTPUT PROFILE :LINEAR

2:Render View Color Management: (Note also make sure to click DISPLAY>32-bit Floating Point)
               IMAGE COLOR PROFILE :LINEAR
               DISPLAY COLOR PROFILE :SRGB

3:Gamma Correct all your color swatches with 0.455 to get them to work into LINEAR COLOR space

4: In Render Settings:
                IMAGE FORMAT: OpenEXR
                DATA TYPE: RGBA (Float) 4x32Bit

                                                                   METHOD 1 RESULTS: 

As expected things dont look right before gamma correction

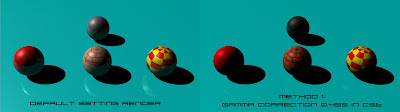
Gamma correction of 0.4545 really saturates and darkens things up and highlight intensity are lost
CONCLUSIONS: This is unpredictable - what i see when setting up my scene in SRBG space and the result are not the same even when gamma corrected. Although in the ballpark and obviously i can adjust until i get the same result on account of the excess data a linear workflow offers, id like something closer to what i had in maya, hence why i dont use this method at this time.

METHOD 2: (Basically what kinda makes sense to me)

1:Render Settings Color Management:
               INPUT PROFILE :LINEAR
               OUTPUT PROFILE :LINEAR

2:Render View Color Management: (Note also make sure to click DISPLAY>32-bit Floating Point)
               IMAGE COLOR PROFILE :LINEAR
               DISPLAY COLOR PROFILE :SRGB

3:Gamma Correct all your file textures and ONLY file textures with 2.2 to get them to work into LINEAR COLOR space

4: In Render Settings:
                IMAGE FORMAT: OpenEXR
                DATA TYPE: RGBA (Float) 4x32Bit

                                                                   METHOD 2 RESULTS: 

As expected things dont look right before gamma correction but the highlights are there
 
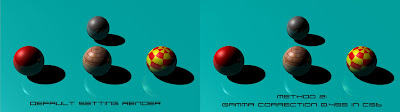
Exactly what i would expect, highlights are there and colors are looking right, and now i have greater room to play with the 32-bit format


CONCLUSIONS: This is what i expect, i get a very close result to my original render from maya - and can now play around and change things up with the greater flexibility LWF offers with its 32-bit files. Hence this is the method i currently use. The way i see it, i use alot less actual file textures than i do swatches most of the time, and hence would much prefer gamma correcting the file textures i bring into maya instead of every freakin color swatch i touch when setting things up. I think Method 1 with no post-gamma correction comes pretty close to what you'd want, however you end up losing alot in the highlights, but if i had a scene with lost of file texture - i'd certainly use it.

SIDE NOTE: For some reason i dont know ( and if you do plz comment here, email me, msg me) - The 'Display Color Profile in the render views color manager, seems to be working in reverse: IE if im expecting a linear file - and hence set the "Image Color Profile" to LinearSRGB, and wasnt to see things in SRGB while i work, and hence set the "Display Color Profile" to SRGB - it actually shows me the freakin' Linear non gamma corrected output (ie not displaying in SRGB space - not sure if this is a bug). But it shows me the SRBG version when i set the "Display Color Profile" to Linear SRGB - ie what i want, but the freakin things reversed. If anyone else runs into this lemme know plz. Also If im doing something wrong here, or ive stuffed up somewhere plz lemme know - coz i myself am kinda new to this and so use these methods as you see fit. Cheers.

UPDATE: Finally figured out why the above was happening. If you have any kind of lens shader attached to your camera - ie mia_exposure_photographic/mia_simple... then you will have the issue stated above. Reason being is that the exposure nodes gamma correction (by default at 2.2) is being countered by the display color profile when it is set to linearsRGB. As far as how this affects your workflow - as far as final batch renders are concerned, leave the exposure node lens shaders gamma correct at default - 2.2. Just live with the fact that you need to switch the display color profile to linear in the render view when making test renders in order to see your image looks like in sRGB space. If you want to see what the linear view will look like when you batch render, then just set the color profile in the render view to sRGB (yeah the exact opposite). Your batch renders will turn out fine if you leave the gamma correction of 2.2 on the lens shader alone (setting it to 0.455 actually makes things worse in the render view - ive no idea) and then you can take your renders and goto photoshop (image>adjustments>exposure>gamma=0.454) for gamma correction as per usual.

Much love to Lester Banks for this great script for automating connecting up Gamma Correction Nodes, Works Like a Charm : LINK

Final Comparison

Monday, November 25, 2013

Concept Design Exhibition - Design Centre Enmore Wed 27th - Fri 29th Nov

Theres to be an end of year/course exhibition for the concept design guys at Design Centre Enmore this coming Wed 27th Nov 6pm-9pm, that goes on for i believe 3 days, if you're in the area its worth checking out. There should be plenty to see from the other courses also : graphic arts, film, 3d... Lots of art, sculptures and plenty of showreels on show and many peeps to chat with and mingle...

i also heard whispers of free grog (ehh but dont quote me on that one). Should be a fun night all the same. Heres a link - unfortunately theres no mention of the concept design course strangely... Click HERE for details. If you cant make it on the night, the show continues on Thursday 28 and Friday 29 November 2013, 10am – 3pm, and HERES a different link to that (finally some mention of concept design)

SUMMARY:
When: Wed 17th November 6pm-9pm. Thursday 28 and Friday 29 November 2013 10am – 3pm
Where: Design Centre Enmore, 110 Edgeware Road, Enmore   


Sunday, November 24, 2013

Trying a hand at traditional sculpting...

This was a real nice change of pace, its awesome being able to explore concepts at the throw of a dice in Zbrush. You can literally start out making a fish and half way scrap the idea and change it up into an orc from mordor when working in 3d, i quickly found at this wasnt the case with traditional sculpting. You really gotta get all your ducks in a row before starting a traditional sculpt, there are huge pitfalls to trying to concept out a piece with traditional sculpey, especially since the clay will literally fall off if it doesnt comply to the armature, if it kinda just hangs off, once the sculpey gets cold over night - it will most likely just fall off, and you'll cry over all the work you had done in the morning when you walk into discover that your piece has self-decapitated overnight. Trust me I know. This happened. I actually ended up resculpting this piece 3 times before finally painting it up.

1st Attempt: head fell off, the sculpey was too far from the armature (had to strip it down and start back from the armature).

2nd Attempt: I did the full sculpt in a generic forward looking pose (kinda what you have a t-pose in 3d i guess), no expression on the face, no Contrapposto, no heart - it was technically sound, but had no heart - and i quickly learnt you cant just repose a real sculpture, i had to resculpt quite abit after bending into a pose.

3rd Attempt: Learnt my lessons well and finally hit a pose i liked and did some self-reference in the mirror to get a nice expression out and finally got it painted up - much thanks to my dog for providing the nose and eye references. Then i learnt it also takes quite a bit to light it... (thank god for my macro lens and experience photographing small stuff). And so heres the result


The Lighting Setup


Saturday, November 16, 2013

Speed Sculpt

Finished this one as fast as i could, was a nice change of pace - working fast means theres less time for procrastination and noodling over details. Working to tight deadlines forces you to think of the big picture and really keep things moving along. Blocked in, in about 3 hours, then many an hour spent detailing...


Wednesday, October 30, 2013

Living where there are no life drawing classes....

Ahhh the pitfalls of living out in the west of sydney unfortunately means a lack of life drawing classes available to us budding artists out this ways. Sometimes i wish i lived in the inner city just so i could walk down to a life drawing gig.... then i wake up and head up into the blue mountains to walk the dog, and am grateful for the lack of crowds which seem to drive me ape-shit and are just plain exhausting to be around. Hence this is my version of a life drawing class - giant masonite board, couple clips to hold the paper, water color brushes and a pencil or two, a tune or two on the headphones, and a monitor with a bunch of pictures - it aint the same as a live model thats for sure, and something is lost there in my opinion, but its better than driving 40k's out of my way.... wish someone would bring up some life drawing clubs out to penrith - if anyone knows of any out this way plz drop me msg. Cheers.


Wednesday, October 23, 2013

Narrative with leanings from toppi

Tried paying more attention to the first read silhouette with this one, as well as trying to tell some sort of narrative story - inspired by toppi. I kept the colors really simple, kinda like just watercolor washes, this helps the colors support the linework as opposed to competing with it in my opinion. Inks on paper, colored in Photoshop.

Hirez can be found HERE


Tuesday, October 22, 2013

Another Concept Creature

Another concept creature conceived in pencil and colorized in photoshop. Hirez version can be found on HERE


Tuesday, October 15, 2013

Creature_009_A2_Concept Design

This was the first time i worked this big - was originally done on A2 sized bond layout paper. An illustration/concept design i did for a prehistoric creature of sorts... Trying out more stuff with line work and texture.


You can see the ultra hirez version HERE

Monday, October 7, 2013

Gorillas

Been trying to loosen up my illustration style and focus on speed and message rather than just technical draftmanship... This was a quick illustration and a reprieve from rendering other stuff... Tying to just flow and emote in an impressionistic style as opposed to achieve realism..

Saturday, September 28, 2013

Second attempt at color pencils...

Heres another attempt at color pencils. This time i used both sides of the drafting paper - this allowed me to get even deeper and richer colors and helped also with adding tone and shades to the piece. It was kind of a god-send working this way in layers really, as the pencils im using seem to get to a point where they make the surface of the paper slick and unworkable. Also this kinda gives you a second avenue for escape if you make a mistake or the colors just dont seem to jive together; the blue/black coat i got on him actually started out with me trying to render it in white - i failed but somehow managed to pull it back together using the second layer.

Of note, using an electric eraser on this surface is abrasive - you can pretty much rub out anything from this surface including watercolor paints as well as gouache, but when you rub out the color pencil the area you rub out becomes slippery and doesnt take the same amount of color as it did originally, you get away with a little more if you just use a regular eraser. I think im gonna look into using fixative at some point when i have to erase large areas - might help give some bight back to the papers surface; i do know however adding too much fixative almost fogs up the surface of the drafting paper leaving white misting - so gotta be careful there.

I also tried using complementary colors in the darker tones of each color rather than black - kinda gives the work a richer look. Layering in different hues of color in very light shades beneath the final color seems to make the colors shimmer optically - this is something i havent seen with printed digital works, not entirely sure why though.

A bit of a crux is that my palette is still limited to 24 pencils at the moment, and unlike paint i cant really get every color under the rainbow by layering - it would just take wayyyy too long than it already does to mix colors this way. On that note color pencils really do take wayyyyyy too long to finish pieces with, just the amount of layering gets quite annoying, but the end result i must admit is really worth it, and the digital scans really dont do the hardcopy justice. My biggest complaint about this medium at the moment however is getting darker shades of color without mixing black, like deeper shades of red would be a god-send at the moment, but alas im relegated to some post work in photoshop - you live and learn i guess....

The pencil sketch - i print this out and place it under the drafting film for reference

The color pencil on drafting film
Burned and dodged as well as extensively color adjusted in photoshop
Digital Alternative - i kinda like this version better.

Wednesday, September 25, 2013

First Go at Color Pencils...

This is my first attempt at working with color pencils, everything besides the background was done traditionally using Derwent Artist Pencils (24pack) on drafting film. Pretty chuffed with how it turned out... thinking i might invest in a full set of polychromos, although i must say working this way is sooooo much slower than digital - takes really long to blend colors; but more satisfying for some bizarre reason.

Cleaned Up Pencil Sketch Used As Underlay

Color Pencils On Drafting Film

Final Comp in Photoshop

Saturday, September 21, 2013

Back to Basics....

Been a while since i posted anything new.... Last couple of months been doing more and more concept design and illustration... kinda at the detriment of sculpting unfortunately. its a constant painful juggle but im a big believer in all areas of art informing one another. Anyways, here a few illustrations on toned paper done using graphite, verithin, and white charcoal - its a nice change from the usual white paper.... Kinda took the approach i used to at the age of 5 years old - keep scumming around on the page with a 7h graphite pencil until shapes emerge - ie no thumbs, no preliminary work - kind of a nice change from whats fast becoming a formulaic way of working in the concept design world - not a good thing in my opinion....


Tuesday, April 30, 2013

Back into the thick of things...

Figured it was about time i posted on this blog again. Been trying to get back into the thick of things and do more concept art and 3d. So heres a few things old and new ... Ill post some of my sketches soon - traditional media has been more my focus as of late, since the seeds to any 3d are in my opinion sown early on in their design and thats really done in quick sketches.